
Soul Rebel Poster Eğitimi (Tr ve İng Anlatımdır.)
1 sayfadaki 1 sayfası

Soul Rebel Poster Eğitimi (Tr ve İng Anlatımdır.)
tarafından GoDFaTHeR Paz Mayıs 09, 2010 11:29 am

So I open a new file in Photoshop 18x24in 300dpi so at the end if the
result is nice I can make a big print to put on my wall. You should
always work with high dpi so your work can be printed with quality.
I select the girl and paste it into a light gray background and this is
how my image begins.
Bu yüzden Photoshop 18x24in 300dpi yeni bir dosya açmak böylece sonunda
sonuç benim duvara koymak için büyük bir baskı yapabilir güzel olup
olmadığını. kalite çalışmaları ile basılmış olabilir bu nedenle
olmalıdır dpi yüksek çalışmak her zaman. Ben kız seçmek ve arka plan gri
hamur içine bir ve bu başlar nasıl resmi.

What I want to do is to work on the girl photo by changing its color and
illumination. First by adding Image>Adjustments>Curves with these
settings giving a blue look to the photo.
Ne yapmak istiyorum kız fotoğrafı renk ve aydınlatma değiştirerek
çalışmaktır. Öncelikle bu ayarları fotoğrafa mavi bir görünüm veren ile
Image> Adjustments> Curves ekleyerek.

Curve Settings RGB
Output: 119
Input: 157 Red
Output: 121
Input: 153 Green
Output: 165
Input: 133 Blue
Output: 149
Input: 99
Eğri Ayarlar RGB
Çıkış: 119
Giriş: 157 Red
Çıkış: 121
Giriş: 153 Yeşil
Çıkış: 165
Giriş: 133 Mavi
Çıkış: 149
Giriş: 99

The result is good and I want to make the colors look more alike so I
will make the light blue outfit more like the hat color by going to
Image>Adjustment>Replace Color click on any part of the light blue
and replace it to a light purple by using these settings:
Sonuç iyi ve ben açık mavi kıyafeti daha şapka renk Image>
Adjustment> Replace Color tıklayın açık mavi herhangi bir oluyor ve
bir ışığa değiştirmek tarafından gibi yapar bu yüzden renkler daha
benzemek istiyorum Bu ayarlar kullanarak mor:

And you result should look like this:
Ve bu gibi görünmelidir sonucu:

It’s almost the way I want
 it’s always good to take
 time in order to get a good result at the end. What I want to do now is
to get a better light on her face so I will duplicate the layer of her
photo and using Image>Adjustments>Contrast (Brightness: 20
Contrast: 0)
And on the layer mask (if you used one
if not just create one) use the Gradient Tool to keep only the top lighter.
Benim neredeyse yol
her zaman iyi sipariş sonunda iyi bir sonuç almak için zaman ayırın etmek. Şimdi ne istiyorum
kullanılan Maske (eğer katmana yüzü onu daha iyi ışık almak çok Ve ben kopya oluşturulacaktır
tabakasının onu fotoğraf kullanarak Image> Adjustments>: Contrast
(Parlaklık 20 Kontrast : ) 0 biri sadece bir tane oluşturabilirsiniz)
eğer sadece üst hafif tutmak için Gradient Tool kullanın.

Now I will create a new layer on top of the girl and using the brush
pack “41 Grunge Brushes” that was mention on the “10 Awesome Free
Photoshop Brushes” I posted two weeks ago.
So selected a couple of different brushes from this pack and painted the
left side of the girl image using the same colors from her image. Using
the Eyedropper Tool click on the girl to select a color and paint it
with the same color on the new layer you created and your result should
look like this:
Şimdi kız üzerinde üst katmanı yeni bir irade oluşturmak ve. Kullanarak
fırça paketini arka iki hafta önce "I" Fırçalar 41 Grunge Brushes
"olarak söz üzerine Free" 10 Awesome Photoshop Yani paketi bu fırçalar
farklı çift seçilmiş bir ve kız resmin sol tarafında onu görüntüden aynı
renkleri kullanarak çizdi. kız Damlalık Aracı tıklayın kullanarak bir
renk seçmek için size ve sonuç aşağıdaki gibi olmalıdır oluşturduğunuz
yeni katman üzerinde aynı renkte boyayın:

Now to give a even better look
I will go back on the girl layer and on the layer mask I will paint the left edge black using
the same grunge brushes to give a impressions that the image is being
painted on that side and I also cut the other leg on and angle.
Şimdi daha iyi bir görünüm vermek için
geri kız tabaka devam edecek ve ben sol kenarına bir gösterimler görüntü o tarafta boyalı
ediliyor ve ben de kesip vermek aynı grunge fırça kullanarak siyah boya
olacaktır katman maskesini ve açısı diğer bacak.

I want to use the angle that I created on her left leg to be a base for
the light and possibly a direction for the typo in case I decide to
write anything in the future.
So I create a couple lines on a new layer on top of the background
this lines will give a special look on the background and also help me with the direction of
everything and different spaces to work on.
Ben gelecekte yazmak bir şey istemek için kullanılan açı karar I baz
benim yarattığım onu olmak bir sol bacak ve ışık muhtemelen durumda
yazım hatası için bir yönü. Yüzden en yeni katman üzerinde çift hat
üzerinde oluşturmak arka plan
bu çizgiler ve arka plan üzerinde özel bir görünüm vermek
aynı zamanda her şeyi farklı alanlarda yönü ile üzerinde çalışmak için yardım et.

So now I will start to work on the background I like what I have so far
and what I will try to get is some kind of abstract background that will
blend in well with what I have so far.
So I create a new layer on top of the gray background layer and with the
Gradient Tool using the Radial Gradient I paint a circle from inside
out to give a better illumination on the girl. Set the layer Fill to
75%.
Bu yüzden şimdi almaya çalışacağız ben ve ne olacak kadar başlatmak için
çok işe arka plan var ne gibi çok var bu yüzden birlikte ne olduğunu
iyi bir çeşit karışımı olacaktır soyut arka plan. Yüzden en yeni katman
üzerinde oluşturmak Gri arka plan katmanını ve Gradient Tool ile ben
içten dışa doğru bir daire boya kız daha iyi aydınlatma sağlamak için
Radial Gradient kullanarak. Set katmanı doldurun% 75 için.

Now I want to add a little something on the background so I got a bokeh
photo that I desaturated and added on to the background
put the layer mode to soft light and the Fill to 46 %
Şimdi arka planda bir şeyler ben desaturated bir bokeh fotoğraf var bu
yüzden eklemek istediğiniz ve arka plana da eklendi
yumuşak ışık ve Dolgu için 46% için katman modunu koymak

My Background is starting to look good still a lot of work to get the
right look we need to get an impressive result. I like to experiment a
lot
I tried a lot of thing until I got the results that I am walking through with you guys so
it’s always to try a bunch a things and stick with the best results.
My new layer is going to have a dark area on the bottom of the image
I used the Gradient Tool using the Radial Gradient to create the dark area on the bottom as you
can see here
I set the Fill to 80%.Benim geçmiş iyi hala çok iş aramak için biz etkileyici bir sonuç elde
etmek için gereken doğru görünümü elde başlıyor. yürüme çok aracılığı
ile siz onun 'demet deneyin hep ben Sevdiğim için bir şey sonuç Ben
kadar var çok deneme denenmiş ben çok
bir şeyler ve sonuçları en iyi sopayla. My yeni katman kalacak resmin altındaki karanlık alan
ben alt olarak burada görebilirsiniz karanlık alan oluşturmak için Radial Gradient kullanarak
Gradient Tool kullanılan
ben% 80 Dolgu ayarlayın.
Once again I create a new layer and with the Polygonal Lasso Tool I
select the right bottom part of the image on the same angle the leg was
cut and apply a Gradient Tool using Linear Gradient with white color.
Bir kez daha yeni bir katman oluşturun ve Polygonal Lasso Tool ile ben
bacak kesildi ve Gradient Tool beyaz renk ile doğrusal Gradient
kullanarak uygulamak aynı açısına görüntünün sağ alt bölümünü seçin.
And set the layer Fill to 20% to get this look:
Ve katmanı doldurun% 20 bu görünümü elde etmek için ayarlayın:

Now using a Pattern I created by making a gray circle in the middle of a
30pixels square document as you can see here.
Şimdi kullanarak burada gördüğünüz gibi Pattern I kare belge 30pixels
ortasında gri bir daire yaparak oluşturdu.

Set that as a pattern with a transparent background. Now create a new
layer and select the middle part of the background and Edit>Fill
Using the pattern you just created.
For a better look add a layer mask to it and using Gradient tool I
create a shadow on the bottom part of it as you can see here
Set bir şeffaf arka plan ile bir model olarak. Şimdi katman yaratmak
yeni ve oluşturulan model sadece seçmek orta kısmının kullanılması>
Fill arka plan ve düzenleyin. Bakmak için daha iyi bir katman maskesi
bir eklemek ve bunu olarak kullanarak alt kısmı gölge oluştururken ben
aracı Gradient burada görebilirsiniz

Now I am going to create a new layer and get a regular round brush
go to brush settings and mark Scattering and paint the whole layer with black
white and gray as you seehere:
Şimdi yeni bir katman oluşturmak ve düzenli bir yuvarlak fırça olsun
ayarları ve işareti saçılma fırça ile tüm katman boya gitmek gidiyorum siyah
beyaz ve gri gibi burada bakın:

Now apply Filter>Blur>Motion Blur with the settings Angle: 45
Distance: 600 and set the layer mode to Vivid Light
and you should get something like this: (if it comes out too dark you can use
brightness/contrast to make it lighter)
Şimdi ayarları Açısı: 45 Mesafe: 600 ile Filter> Blur> Motion Blur
uygulayın ve Vivid Light katman modunu ve bu gibi bir şey elde
olmalıdır: (çok karanlık / kontrast yapmak parlaklık kullanabilirsiniz
çıkar eğer çakmak)

On a new layer I will apply some color now making some yellow stripes
following the lines that I made in the beginning
set the layer mode to Overlay and Fill to 25%.
And you can also take a look of what you should have for the background
layers.
katmanda yeni bir ben
başında uygulamak biraz renk yaptığım satırları şimdi yapım aşağıdaki çizgili bazı sarı-ecek%
Dolgusu'nun 25 moduna tabaka ve Yerleşimi. Ve yapabilirsiniz için
gereken var ne de bir bakmanız almak Arka plan katmanı.

I am going to use this photo that I took in NYC a while ago
and I am going to paste it on top of the background layer
Ben bir süre önce
ben de arka plan katmanını üstüne yapıştırmak için gidiyorum NYC aldı bu fotoğrafı
kullanmak için gidiyorum

Desaturate the photo Image>Adjustment>Desaturate and set the Fill
to 40%.
Desaturate fotoğraf Image> Adjustment> Desaturate ve% 40 Dolgu
ayarlayın.
 | Resim Www.Duslerforum.ORG Tarafından Küçültülmüştür,Orjinal Boyuta Dönmek için Tıklayın.1200x1600. |

Our background is coming along very well now on top of the yellow
stripes layer we are going to create another layer that we will add a
white light created using the Gradient Tool > Radial Gradient
Tarihimiz boyunca çok iyi şimdi sarı çizgiler tabakanın üstüne başka bir
katman ki beyaz ışık katacak oluşturuyoruz Gradient Tool> Radial
Gradient kullanılarak oluşturulan geliyor

Create another layer and with the Single Column Marquee Tool create a
bunch of lines
when you get a good amount
rotate them on a 45 degree angle and place them on the top right as you can see on the
image
Başka bir katman ve Tek Sütun Marquee Tool ile
çizgiler bir grup iyi bir miktar olsun oluşturmak için 45 derecelik açı bunları döndürün ve sağ üst görüntü
üzerinde gördüğünüz gibi koyun

Now is time to give the special look to the image by adding a tiger
coming out of her body
so I had this photo here for the longest time and I always had a feeling I would use it for
something good
so I did.Şimdi zaman görüntü bir kaplan vücudunun gelen ekleyerek özel bir
görünüm vermek için
bu yüzden uzun zaman bu fotoğraf burada vardı ve hep iyi bir şey için kullanacağınız bir his
vardı
ben de.
Selected the tiger
don’t really need to be agood selection since we are going to apply the same technique we did
with the right side of the girl with the 41 Grunge Brushes
do that around your selection on the layer mask and set the layer to Overlay.
You should get something like this:
biz 41 Grunge Brushes ile kızın sağ tarafı ile yaptı aynı tekniği
uygulamak için gidiyoruz yana
gerçekten iyi bir seçim olması gerekmez kaplan seçilen bunu set katman maskesini seçiminizi ve
çevresinde Overlay tabaka. Bu gibi bir şey elde olmalıdır:
| Resim Www.Duslerforum.ORG Tarafından Küçültülmüştür,Orjinal Boyuta Dönmek için Tıklayın.1168x1068. |

I want to create some smoke on that background so I make a new layer and
using the smoke brush pack that I posted here 25 Free Photoshop
Brushes. Make some smoke on the right side and set the layer Fill to 50%
Ben yeni bir katman yapmak çok ve burada 25 Ücretsiz Photoshop Fırçaları
arka duman fırça paketini kullanarak bunu arka plan üzerinde bazı duman
yaratmak istiyoruz. Sağ tarafta biraz duman olun ve tabakayı doldurun%
50

Just like we created the yellow stripes we are going to create a green
stripe now only on the top part
set the layer mode to Soft light and the Fill to 75%.
biz şimdi sadece üst kısmı yeşil bir şerit oluşturmak için gidiyoruz
sarı çizgiler oluşturulmuş gibi
yumuşak ışık ve Dolgu için% 75 katman modunu.

If you have been following all the steps here is a look at the layers
and what you should have so far.
Burada tüm adımları takip varsa katmanları bir göz ve ne kadar geçmesi
gerekir.

We got a pretty good point so far I know the colors don’t look very
impressing but I like to save that for last. Now I want to put some more
stuff on the bottom right because I am thinking about adding a text
there.
So first thing I do is using this galaxy photo I have
Biz şimdiye kadar renkler çok etkileyici görünmüyor bilmek oldukça iyi
bir nokta var ama kaydetmek gibi sürer bu. Ben bir metin oraya ekleme
düşünüyordum çünkü Şimdi sağ alt biraz daha şeyler koymak istiyorum.

Put it on our image on top of the girl layer and place it on the bottom
right
desaturate the layer and set the layer mode to Exclusion
also give it a layer maskand go around the edges so it won’t be to rough as you see here
Bizim resme kız tabakanın üstüne koyun ve sağ alt üzerine yerleştirin
tabaka Desaturate ve Dışlama için katman modunu da bir katman maskesi vermek ve kaba olarak
alınmayacaktır etrafında kenarları gitmek Burada gördüğünüz

Now on a new layer I am going to add some smoke on that same area to
fill up that space a little more.
Şimdi biraz daha bu alanı doldurmak için aynı alanda bir miktar duman
eklemek için gidiyorum yeni bir katman üzerinde.

One more thing that I want to do is create a new layer and add some more
of that Grunge Brushes at the bottom of the girls to blend in more
so I do that using some dark colors as you see.
Our background is pretty filled up now and we got to the point that
everything seems to be in place and looking good
to make an even better blend of the girl and the background I will add a typo on a angle right
where here leg connects to the line.
As I have been listening to Bob Marley all through out the process of
creating this image I wanted to name it Soul Rebel because that song got
stock on my head and I kept playing it as I was finishing the image.
So I wrote down SOUL REBEL using the font MOD that can be found here
Friday Fresh Free Fonts #1 set the layer Fill to 61% and to get the typo
on the same spirit of the image I used that same effect on the typo
using the Grunge Brushes as you can see.
Bir şey daha bu yapmak istediğim görmek yeni oluşturduğunuz katmanı bu
gibi renkler kullanarak bazı karanlık daha fazla bazı ve eklerim ben çok
daha fazla
Grunge için kız alt karışım Fırçalar güncellenmiştir. Tarihimiz doldu dolu güzel şimdi biz
iyi seyir yeri ve got için her şey bu noktaya görünmek için
hat yapmak bir karışımı daha da iyi bacak bağlayan burada açısı doğru bir bir yazım hatası
üzerinde kız ve ekler arka plan ben. gibi I Rebel Soul Bob edilmiş
dinlemek istediği için adını ben görüntü oluştururken bu Marley süreci
dışında tüm aracılığıyla çünkü o şarkıda kafa benim bindik hisse senedi
oldu ve resim tamamlama Ben olarak tutulur gör. yüzden font REBEL
kullanarak SOUL yazdı aşağı MOD burada Cuma Taze Yazı # 1 doldurun% 61
ve tabakayı ben yazım hatası Gördüğünüz gibi Grunge fırçalar
kullanılarak aynı etkiye kullanılan görüntü aynı ruhu üzerinde yazım
hatası almak bulunabilir.

Now with a smaller font I wrote LET YOUR INSIDE OUT with a darker color
and set the layer Fill to 69%
but the darker color kindof blended in to the background and it’s kind of hard to see so I
create a new layer under it
with a regular brush makea small line using color white
give some motion blur to expand the line and place it right under the typo
just like I did here:Şimdi daha küçük bir yazı ile I LET SİZİN İÇİ OUT yazdı koyu renk ve
tabakayı doldurun% 69
ama karışık ve koyu renk çeşit arka plan ve zor tür yüzden altında yeni bir katman yaratmak
görmek
düzenli bir fırçaküçük bir çizgi
bazı hareket hattı genişletmek için bulanıklık vermek ve doğru yazım hatası altında yer
renk beyaz kullanarak yapmak ile tıpkı burada yaptı:

On this point I can say that my composition is done
and I really like what I have
now is the part that I like the most
play with the colors. There is a lot of ways I do this and I am sure a lot of people do it
differently and so on.
What I did was add a new layer on top of all the others
paint it bright yellow and set the layer mode to Linear Burn.
Benim kompozisyon yapılır söyleyebiliriz Bu noktada
ben gerçekten ne var gibi şimdi bölüm benim renklerile en çok oynamam gibidir. Bu benim yollarından biridir yeri bir ve I
am çok bir emin insanlara o farklı ve bu yüzden. Ne sarı parlak üzerinde
üst katmanı yeni bir gibiydi eklemek diğerleri
boya ve Lineer katman moduna ayarlamak Burn.

Now another layer on top and this one I am going to paint it light
purple and set the layer mode to Linear Light and the Fill to 75%.
As a result we get this beautiful color and result to our image.
Şimdi üst katman başka ve eflatun bu boyayın gidiyorum bir ben ve%
Dolgusu'nun 75 Doğrusal set katman moduna Işık ve. Sonucunda bir biz
renk olsun bu güzel ve görüntü bizim sonuca.

Now to give a final touch I create a new layer and I pick a very light
blue as my color
and using the Gradient Tool / Radial Gradient I paint the light blue around my image
so I set the layer mode to Soft Light and the fill to 35% as you can see it gives a different
color look around the image.
I really like that but I only want that effect on the bottom of the
image so I add a layer mask to it and using the same Gradient Tool this
time Linear Gradient I take off the top part as you can see here with
the layer.
Şimdi yeni bir katman yaratmak son vermek için ve ben de renk olarak çok
açık mavi almak ve Gradient Tool / Radial Gradient Resmimi etrafında
açık mavi boya kullanarak
bu yüzden Soft Light ve katman modunu image 35 doldurmak için% etrafına bakmak gibi renk verir
farklı görmek yapabilirsiniz. gerçekten seviyorum ki ama ben sadece
görüntünün altındaki etkisi istediğim şu ki bu kadar bir katman maskesi
eklemek ben ve zaman aynı Gradient Tool Bu yöntemi kullanan Linear
Gradient Burada tabakası ile gördüğünüz gibi üst kısmını çıkarıyorum.
CONCLUSION
My advice to everyone that followed the tutorial
and want to take their work to the next level is to experiment a lot while creating your image
have a main idea in mind and work around it
give time to get your work done. It’s better if you create one good piece in a month than have
10 crap ones by the same time.
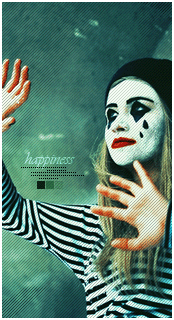
So here is the final result
I will put up the .psd ona lower resolution for download in case you have any doubts you can
check out the .psd and have fun!
SONUÇ herkese tavsiye My öğretici takip ve düzeyi yanında çalışmak kendi
istediğiniz almak yapılması için deneme oluşturduktan çok süre görüntü
bir ana fikir var
zihin geçici ve o iş senin olsun vermek zaman.zaman aynı tarafından olanlar var 10 daha bir ay içinde iyi bir parça
oluşturmak daha iyi eğer. Yani burada sonuç final
ben kontrol edebilirim size psd üzerinde durumunda çözüme yönelik düşük bir sahip herhangi bir
şüpheniz. psd ve eğlenin!

GoDFaTHeR- Farkımız*Tarzımız*

 Mesaj Sayısı : 3016 Rep Sayısı : 455 Kayıt tarihi : 30/04/10
-

1 sayfadaki 1 sayfası
Bu forumun müsaadesi var:
Bu forumdaki mesajlara cevap veremezsiniz